Updated on 2026-03-24
views
5min read
You closed a document and clicked "Don't Save" by mistake. Or Word crashed before you had a chance to save. Or you saved but immediately regretted overwriting the previous version.
These three situations look identical from the outside—"I lost my Word document"—but they need completely different solutions. Using the wrong method wastes time you might not have.
Before doing anything else: stop creating new documents and stop saving other files. Word's recovery files exist in temporary storage that can be overwritten by new file activity. The faster you act, the better your chances.
The 60-Second Triage Guide
Answer these questions to jump straight to the right method:
| Your situation | Most likely fix | Go to |
|---|---|---|
| Word crashed or Mac shut down unexpectedly | AutoRecovery folder | Method 1 |
| You closed Word and clicked "Don't Save" | Word's Recover Unsaved Documents | Method 2 |
| File was saved but you need an earlier version | OneDrive version history or Time Machine | Method 3 or 4 |
| You use Microsoft 365 with OneDrive | AutoSave version history | Method 3 |
| Nothing worked, file is critically important | Third-party recovery software | Method 6 |
Understand Before You Act: Why Word Loses Files on Mac
Word runs two separate protection systems, and understanding the difference explains why you look in different places depending on what happened.
AutoRecovery creates hidden temporary .asd files in a protected folder every 10 minutes by default. These are crash insurance—they're automatically deleted when you close Word normally (because normal closure means you either saved or chose not to). They only survive when Word exits abnormally.
AutoSave (Microsoft 365 only) creates permanent versioned copies in OneDrive at frequent intervals. Unlike AutoRecovery, these persist even after normal closure and are accessible through OneDrive's version history.
The practical consequence: if Word crashed, look for AutoRecovery files. If you manually clicked "Don't Save," AutoRecovery files were deleted on exit—you need Word's Recover Unsaved Documents feature instead, which accesses a separate unsaved drafts folder.
Method 1: AutoRecovery Folder (After a Crash or Unexpected Shutdown)
Best for: Word crash, Mac force restart, power outage Success rate: ~85% if AutoRecovery was enabled
If Word or your Mac shut down unexpectedly, Word likely saved an AutoRecovery backup in a hidden folder. Check here first before trying anything else.
AutoRecovery folder locations by Word version:
· Word 2019/2021/365: ~/Library/Containers/com.microsoft.Word/Data/Library/Preferences/AutoRecovery/
· Word 2016: ~/Library/Application Support/Microsoft/Office/Office 2016/AutoRecovery/
· Word 2011: ~/Library/Application Support/Microsoft/Office/Office 2011 AutoRecovery/
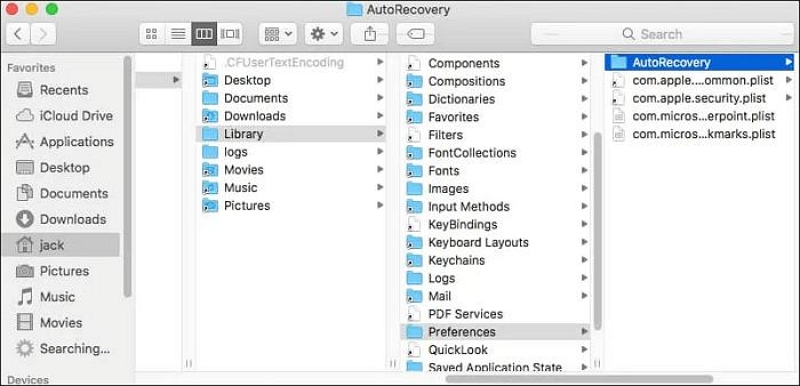
How to access the hidden Library folder: Open Finder → click Go in the menu bar → hold the Option key → Library appears in the dropdown → click it.
Inside the AutoRecovery folder, look for .asd files. These won't open by double-clicking—you need to open them through Word:
- Open Word
- Go to File → Open → Recover Unsaved Documents
- Find the .asd file with the most recent timestamp matching your document
- Click Open, then immediately File → Save As to a permanent location
Real experience: The AutoRecovery folder feels intimidating because the filenames are cryptic (timestamps and partial names), but sorting by Date Modified makes it straightforward. The most recent .asd file is almost always the one you want. Open it, confirm the content looks right, and save immediately before anything else.
If the AutoRecovery folder is empty: Open Terminal and run open $TMPDIR, then navigate to TemporaryItems. You may find .asd or .tmp files there. Also check OneDrive or SharePoint if you've ever saved to those services.
Method 2: Recover Unsaved Documents (After Clicking "Don't Save")
Best for: Closed Word and clicked "Don't Save" by mistake Success rate: ~70%
When Word closes normally—even if you clicked "Don't Save"—it briefly stores a copy in a separate unsaved documents cache before AutoRecovery files are deleted. This cache is distinct from the AutoRecovery folder and persists for up to 4 days.
If Word shows a Document Recovery panel on relaunch: This appears automatically when Word detects it exited abnormally. Click your document's name in the panel to restore it, then save immediately.
To access manually: File → Manage Document → Recover Unsaved Documents
This opens the UnsavedFiles folder (typically at ~/Library/Application Support/Microsoft/Office/UnsavedFiles/). Look for .asd files sorted by modification date.
Important: These drafts expire after approximately 4 days. If you're reading this a week after the incident, this method won't help.
What you'll typically find: The recovered version is the state of the document at the last AutoRecovery interval before closing—usually within 10 minutes of when you last had content. If you typed for 8 minutes and then accidentally closed without saving, you'll likely recover most of what you wrote.
Method 3: AutoSave and OneDrive Version History (Microsoft 365 Users)
Best for: Microsoft 365 subscribers; recovering an overwritten document; finding an earlier version Success rate: ~95% for files saved to OneDrive
If you use Microsoft 365 and your file was saved to OneDrive, AutoSave creates frequent version snapshots that persist permanently. This is the most reliable recovery method when it applies.
Access version history inside Word: Open the document → File → Version History → View All Versions → browse by timestamp → click Restore on the version you need.
Access version history through OneDrive web:
Step 1. Sign into onedrive.com and locate your document
Step 2. Right-click the file → Version History
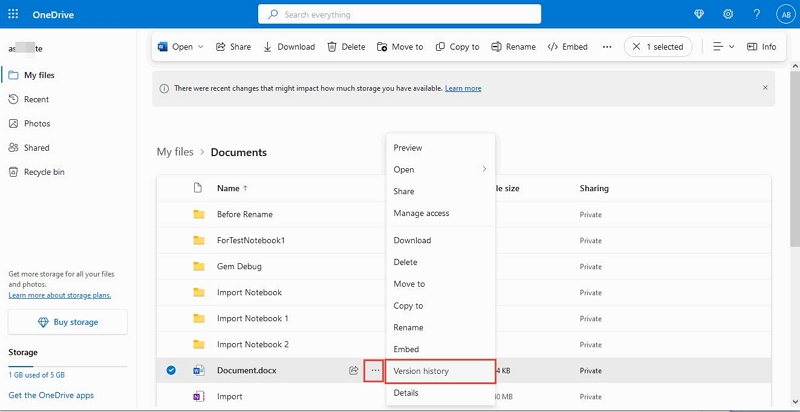
Step 3. A timestamped list of saved versions appears
Step 4. Hover over the version you want → click Restore (overwrites current) or Download (saves a separate copy)
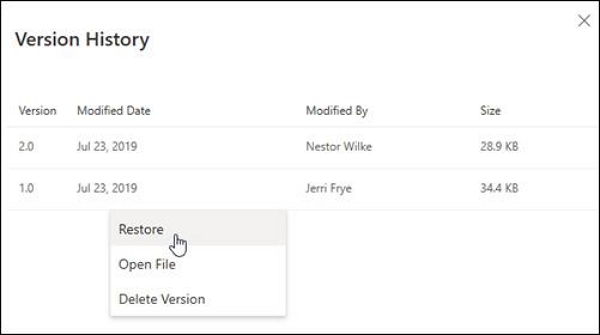
Downloading rather than restoring is safer when you're uncertain which version to keep—you can compare the two files before deciding.
If AutoSave was off: Check whether the toggle in the top-left corner of Word was enabled. AutoSave is on by default for Microsoft 365 subscribers, but it only activates once you've saved the file to OneDrive at least once. A document you created but never saved to OneDrive has no version history.
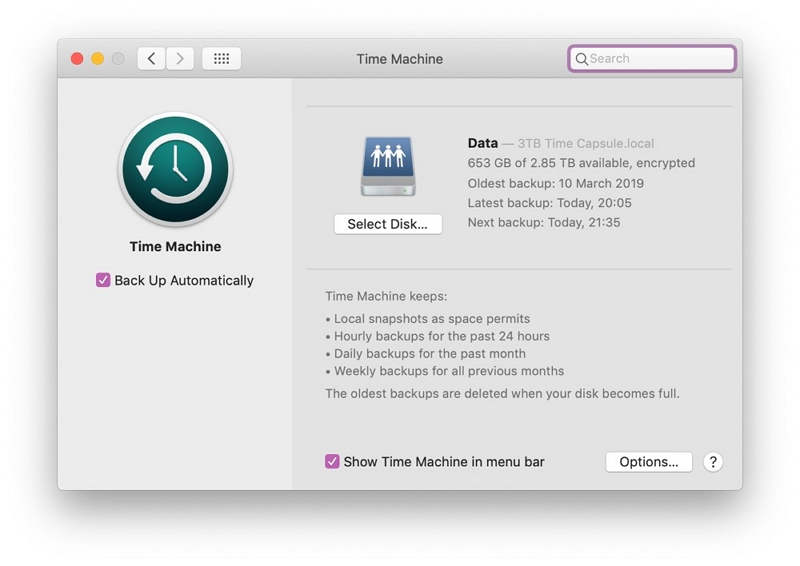
Method 4: Time Machine (Overwritten or Deleted Saved Files)
Best for: File was saved at some point but overwritten or deleted Success rate: ~90% if Time Machine was running before the file was lost
Time Machine can't recover a document you never saved—it only backs up files that existed on your Mac's storage. But for recovering an older version of a file you saved and then overwrote, it's the most reliable free option.
Step 1. Open the folder where the document was originally saved
Step 2. Click the Time Machine icon in the menu bar → Enter Time Machine (or go to System Settings → General → Time Machine)
Step 3. Use the timeline on the right edge or the arrows to navigate to a date before the unwanted changes
Step 4. Find your file, select it, click Restore
If you're looking for a specific version: use the Finder search bar within Time Machine to search by filename, then compare modification dates across the timeline.
Method 5: Mac Trash and Temp Folder
Best for: Quick check before trying complex methods Success rate: ~60% in applicable scenarios
Check the Trash first: Your Mac sometimes moves temporary Word recovery files to the Trash rather than silently deleting them. Open Trash and look for a folder called Recovered Items or TemporaryItems. If you find a .asd file that matches your document, right-click → Put Back.

To search: press Cmd+Space to open Spotlight, type the filename or .asd, and check if results include Trash items.
Check the Terminal temp folder: Open Terminal and run: open $TMPDIR
Navigate to the TemporaryItems folder. Look for .asd, .tmp, or unnamed files. If you find a .asd file, open it through Word: File → Manage Document → Recover Unsaved Documents.
The success rate here is lower than Methods 1–4 because these temp locations are cleared more aggressively by macOS. Worth checking quickly, but don't spend significant time here if Methods 1–4 haven't worked.
Method 6: Third-Party Recovery Software (Last Resort)
Best for: All other methods failed, file is critically important Success rate: 10–40% for files that were never saved to disk
When no built-in option works, data recovery software can scan your Mac's storage for file fragments that haven't yet been overwritten. For files that were never saved (pure crash scenario with AutoRecovery disabled), success depends heavily on how much the drive has been used since the loss.
Critical rule: Install recovery software on an external drive, not your Mac's internal drive. Installing on the same drive risks overwriting the exact fragments you're trying to recover. Apple's APFS filesystem actively reclaims deleted storage, so acting quickly matters.
Reliable tools for Mac:
Datile Computer Recovery: Scans your drive and shows you recoverable files before you pay. The preview is genuinely useful—if your file doesn't appear in the scan, you know before spending money.
Stellar Data Recovery for Mac: Strong APFS support and a dedicated Office document recovery module. Free version shows what's recoverable; paid version exports.
TestDisk / PhotoRec (free, open-source): Command-line tools for technically confident users. No cost, no recovery limit, but requires comfort with Terminal.
Honest assessment of success rates: Recovery software vendors often advertise high overall success rates that include easily recoverable deleted files (photos, documents in Trash). For a Word document that was never saved to disk at all—meaning AutoRecovery was disabled and Word closed normally—the underlying data may simply not exist anywhere on the drive. Paid software is worth trying when the document is irreplaceable, but it's not a guaranteed solution for the hardest cases.
Special Situations
Word crashed before you could save on an M1/M2/M3 Mac
AutoRecovery file location is identical on Apple Silicon Macs: ~/Library/Containers/com.microsoft.Word/Data/Library/Preferences/AutoRecovery/. Rosetta 2 doesn't affect where recovery files are stored.
File saved to Desktop then disappeared
Almost certainly moved by iCloud Drive sync. Sign into iCloud.com → iCloud Drive → Desktop folder. Files synced from your Mac's Desktop appear here. If the file shows up, you can download it or re-sync it.
Collaborative Word document was lost
If you were co-editing through OneDrive or SharePoint, version history is available to all collaborators: File → Info → Version History. The history is server-side, so it's unaffected by what happened on your local machine.
Word keeps crashing before you can save
Likely caused by a conflicting add-in. Launch Word in Safe Mode by holding Option while clicking the Word icon. If Word is stable in Safe Mode, an add-in is the culprit. Go to Tools → Templates and Add-ins and disable them one at a time to identify which one causes the crash.
XII. Prevention: Never Lose a Word Document Again
In this section, we will discuss prevention tips that will help you keep your work safe at all times. By following the suggestions below, you will no longer end up in any compromising situations, even if your system acts up.
Tier 1 — Takes 2 Minutes to Set Up
The first step is to enable AutoRecovery and set the interval to 1–2 minutes so that any important changes are backed up, at least in the form of temporary files. Simply follow the pathway below to set up AutoRecover:
Open Word → Go to Preferences → Save → AutoRecover every 1-2 minutes
Microsoft 365 users can turn on AutoSave by enabling the option in the top left toolbar. This will help create separate copies of your work and have offline/cloud access to all previous versions as individual files.
Tier 2 — Takes 10 Minutes to Set Up
Next, you should enable Time Machine with an external drive or NAS. Connect the external drive to the Mac and Open System Settings > General > Time Machine. Add it to the Time Machine to help you back up your data better.
To have an online backup, set up OneDrive or iCloud Drive sync for your Documents folder.
Tier 3 — Habits That Cost Zero Time
The third tier of preventing your Word files from getting lost involves building a few habits that don’t actually take up a lot of time. First, use ⌘ + S as a reflex whenever you pause to think. This will save your work and allow you to use the Time Machine to retrieve your work in case Word crashes down the line.
Next, and this is quite counterintuitive, never close Word by clicking the red button. Instead, use File → Close so that Word prompts you to save your file if you haven’t done so already.
Lastly, keep Word updated to the latest version. The newer versions have significantly improved crash recovery, which will solve any bugs that you might have with your current version. This way, you will be minimizing the risk of your software crashing in the first place.
XIII. FAQ — Targeting "People Also Ask" Directly
Q. Where are unsaved Word documents stored on Mac?
In the AutoRecovery folder at ~/Library/Containers/com.microsoft.Word/Data/Library/Preferences/AutoRecovery/ (Word 2019+). These .asd files only exist if Word exited abnormally—they're deleted on normal closure.
Q. How do I recover a Word document I accidentally closed without saving?
Go to File → Manage Document → Recover Unsaved Documents in Word. This accesses the UnsavedFiles cache, which retains drafts for approximately 4 days after an unsaved close.
Q. What's the difference between AutoSave and AutoRecovery?
AutoRecovery creates temporary .asd files locally that are deleted on normal exit—crash insurance only. AutoSave (Microsoft 365) creates permanent versioned copies in OneDrive that persist indefinitely and are accessible through version history.
Q. Can I recover a Word document after emptying the Trash?
The Trash itself won't help once emptied, but check AutoRecovery, the UnsavedFiles folder, OneDrive version history, and Time Machine. If the document was ever saved to disk, Time Machine or OneDrive likely has a version.
Q. How long does AutoRecovery keep unsaved files?
Approximately 4 days. After that, the temporary files are cleared automatically. Act within that window if you need to recover from an unsaved close.
Q. Why is my AutoRecovery folder empty?
Either Word exited normally (files were deleted automatically), the 4-day expiry passed, or AutoRecovery was disabled. Check Word → Preferences → Save to confirm AutoRecovery is enabled and note the interval setting.
Q. Does the recovery process work the same on M1/M2 Macs as Intel?
Yes. AutoRecovery file locations and all recovery methods described here work identically on Apple Silicon and Intel Macs.
XIV. Conclusion
The steps for you to restore your Word document will depend on your current situation. If there’s one setting you must enable before closing this article, it has to be the AutoSave and AutoRecovery feature on Word, since it creates timely backups that you can utilize to restore previous versions seamlessly. Remember, built-in tools can help you get the job done most of the time. Third-party tools should be the last resort, not the first solution you reach for.